C++: The Basics - eps1.1_GettingStarted
Hello and welcome to the first episode of the first season of the series on C++. In this season, we’ll get the basics of the programming language down and learn about the structure of a C++ program. So hold on tight, because …
… now we get started
Usually software documentations, ReadMes, textbooks or courses start with a Getting Started. This section is meant to ease the entry into the foreign software, framework or library and to show a newbie the appropriate starting point. Since I would like to do the same, we start in an exemplary way with a Getting Started.
The steps to the executable file
When it comes to source code, the analogy to languages is not chosen without reason. Programming languages are used for communication between humans and machines. Just like spoken languages, they have a syntax, vocabulary and structures that must be mastered. But before we get into the language and its grammar,
- Oh man, that sounds like German lessons… -
I want to make you aware of the big goal behind it. In the end, all we really want is an executable that does the job we want it to do. We get there in three simple steps:
- Write C++ code with a text editor.
- Compile the code with a C++ compiler
- Link all the output of the compiler with a linker to finally get the executable file
After you write your code in C++, it is typically saved as a text file with the extension .cpp at the end.
In the compilation step, your code is converted into machine code. This consists of a long string of zeros and ones. The processor understands only such strings and thus knows which tasks are to be executed.

Figure 1: Zeros and Ones
Larger programs consist of several files, which the compiler converts one after the other and creates an object file from each. You can recognize these by the extension .o or .obj. During compilation all required object files are generated, but the compiler ignores the dependencies of the .cpp files among each other.
For this reason, the linker is used in the last step. It creates the links between the files and resolves the dependencies. After successful linking, an executable file is created, which you can then run and distribute. This entire process is called the build process.
In the beginning there was “Hello World!”
Now that you know all the tools and steps, it’s time for your first application. It’s almost a tradition to write a “Hello World!” program first. This little program shows all the necessary parts of a complete code and gives you a first insight into the syntax.
The task of the program is quite simple. It should simply print the text “Hello World! I know, this is not a very imaginative example and it is used by almost all textbooks or beginner courses. But I like to stick to traditions.
Coding
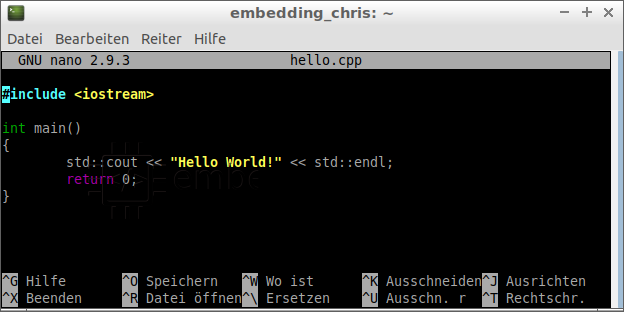
Simply open any text editor of your choice and enter the code sample from Figure 2. Then save the file e.g. under the name hello.cpp. The extension .cpp is important. How you want to name the file is up to you.

Figure 2: hello.cpp in GNU nano text editor
// listing1: hello world

#include <iostream>

int main()
{
    std::cout << "Hello World!" << std::endl;
    return 0;
}
Since I started my journey with the resolution - goals, goals! Good resolutions should be abandoned by the end of February at the latest - to use only open source software, I work on a Linux operating system.
To create the hello.cpp file, I simply call the Command Line Terminal with the key combination STRG + Alt + T. With the command nano hello.cpp the nano text editor opens in the terminal with the new file hello.cpp. There I type the source code of our “Hello World” program and save the file with the key combination STRG + X.
Building and Execution
Now we are not that far away from our first executable file. The first step, writing the code, is done and now we have to compile our C++ file. For this I use the free GNU C-/C++ compiler that comes with most operating systems (for a quick try I also use Online Compiler). Starting the build process is very easy. I just have to enter in the terminal the command
// listing2: compile

$ g++ -o hello hello.cpp
in the field below. Our executable hello is already created. Afterwards I enter the command
// listing3: run

$ ./hello
Listing 2
and lo and behold, the program prints “Hello World!” on the terminal.

Figure 3: Terminal with all commands
Since our code example from Listing 1 is standards-compliant, it can be compiled with any C++ compiler for any operating system. So you can also build and run the example unmodified on your Windows PC using the appropriate tools.
Congratulations!
We have just written our first small C++ program and it works. With this we have completed the most important stage: Getting started!
Surely you have some questions about single steps and you are not sure yet what every detail means. I can understand that, because I didn’t mention everything on purpose. I just want you to get an overview of the whole creation process here and not get lost in details.
In upcoming blog entries we will delve deeper and deeper into the C++ programming language. In doing so, we will gradually learn more about the build process of software.
I wish you maximum success!